The size, (in bytes and pixels) of the cover image for either our torrent info pages, or embedded in an audio file, should be considered.
On our webpage, an image over 1MB can take a noticeable time to load, depending on your connection speed, and also how fast the image host is.
Also, all cover images are displayed at 250 pixels wide, regardless of the actual size of the image. So larger images look no better.
If you are making your own audio files, you probably embed a cover image.
An M4B only has one image for the whole book. But a set of dozens of MP3, each with a 2MB image, can add a lot to the total. That impacts the size of the torrent download, and also impacts storage on mobile players.
Standard embedded cover image is a square 500 to 600 pixels, originally set for iTunes, iPods, now universal.
The portable players or phones most people use to play audiobooks have rather small screens, so again, a huge image is just more space with no better result.
I find a JPEG 500 px, no more than 100kB, gives a good result for both uses of a cover image.
For instance this 800x800px 1.5Mb PNG file was used as a cover.
Here it is shown as on our webpage, 250 px wide

PNG files have lossless compression, and so usually much larger than a JPEG file (with lossy compression) that looks indistinguishable, especially at 250 px.
Below is a JPEG, sized at 500x500px, 25 kB, i.e. 2% of the size of the PNG; also displayed at 250px wide.

So basically identical result.
There are many image utilities, and some websites, that can manipulate images file.
You don't need a full powered image editor like PhotoShop.
I use
Irfanview (Windows freeware) to convert and scale, crop and do simple editing on images. You can save as JPEG and it will display the result image and filesize as you adjust the compression. Also very good for managing folders of images.
Here's a quick how-to, showing how the above image was transformed.
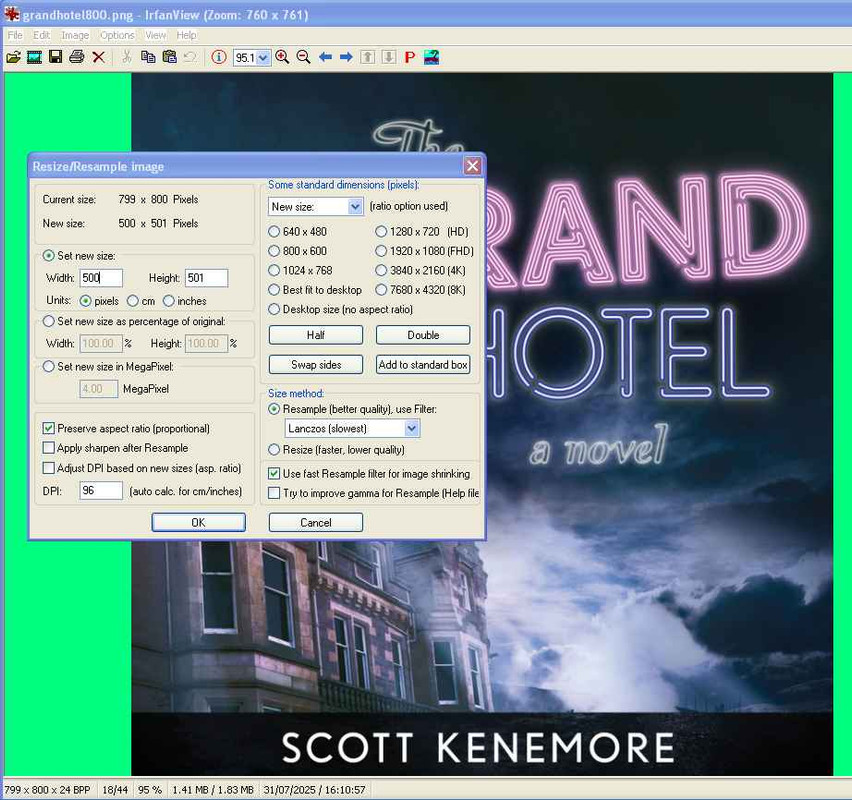
STEP 1: RESIZEFirst, display the image. The images size is shown on the bottom of the window,
As this is 800 px, first resize to 500: Image/Resize
Make sure "Preserve aspect ratio" is set, otherwise it may be distorted.
 STEP 2: SAVE AS JPEG
Now save the file as a JPEG.
File/Save (Original folder) and choose a name, and select the type as JPEG.
(Important to choose a different name than the source file or it will overwrite it, if the same type.)
The "JPEG/GIF save options" window comes up.
Put "Save quality" at 50. This is not final, you can change it if you also
set "Show preview dialog".
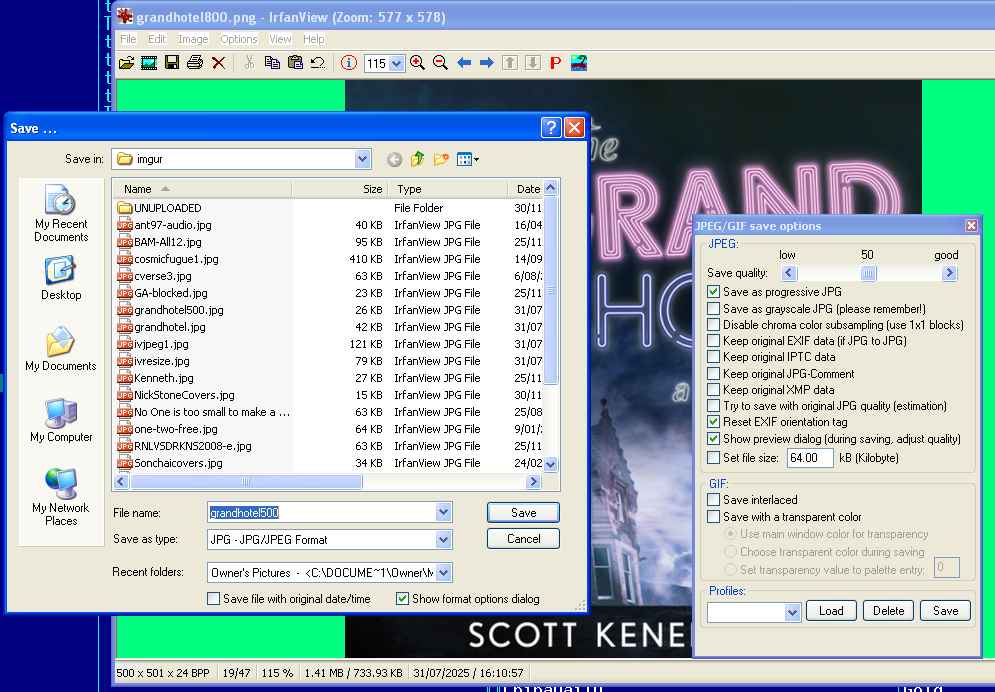
Now the Preview window comes up. It shows the image as it will be saved at the quality selected.
If the image seems blurred, you can increase quality and see how that looks, and also see the cost in kB.
(Remember the size it will be displayed at, not full screen on your desktop.)
When you're happy, click "OK" and the new image is saved.

